lightpotions
Just another WordPress.com site
Hello, Gum!

 The purpose of this blog is to help me track progress, errors, successes and to exchange information with others who may experience similar technical (or conceptual?) problems while using alternative photographic practices. Previously I’ve kept a written journal and I’m sure that I will continue to do so, but this offers not only an alternative means of archiving, but also the potential to interact with like-minded practitioners.
I first began experimenting with historic photographic processes back in 1997 while a grad student at LSU, but the necessity for a larger, quality negative presented an obstacle I was unwilling to resolve. Much later when I was teaching at Diablo Valley College in California I began to print and assemble tissue boxes using Ware’s cyanotype (type II) formula and a combination of 4×5″ and 135 negatives. I enjoyed working at home on this and printing in the summer sunshine, but still only saw it as a niche process because of the limitations of my negative size. That all changed as I began researching materials for an alt. photo class I would be teaching the following summer (2006?). I read a good deal about digital negative production using an inkjet printer and began to experiment using scanned 4×5 negs and curves in Photoshop to print onto Pictorico OHP using an Epson 4880 printer. I found that I could produce good quality cyanotype prints at a satisfactory size (11×14″ or greater) using custom curves I derived from step tablets based on generously provided information from Ron Reeder (Digital Negative book and personal correspondence as I was attempting to perfect an ink density / curve for salted paper).
This began an enduring pursuit to produce my photographic projects using cyanotype, salted paper & especially gum bichromate (which is mostly what this blog will center around).
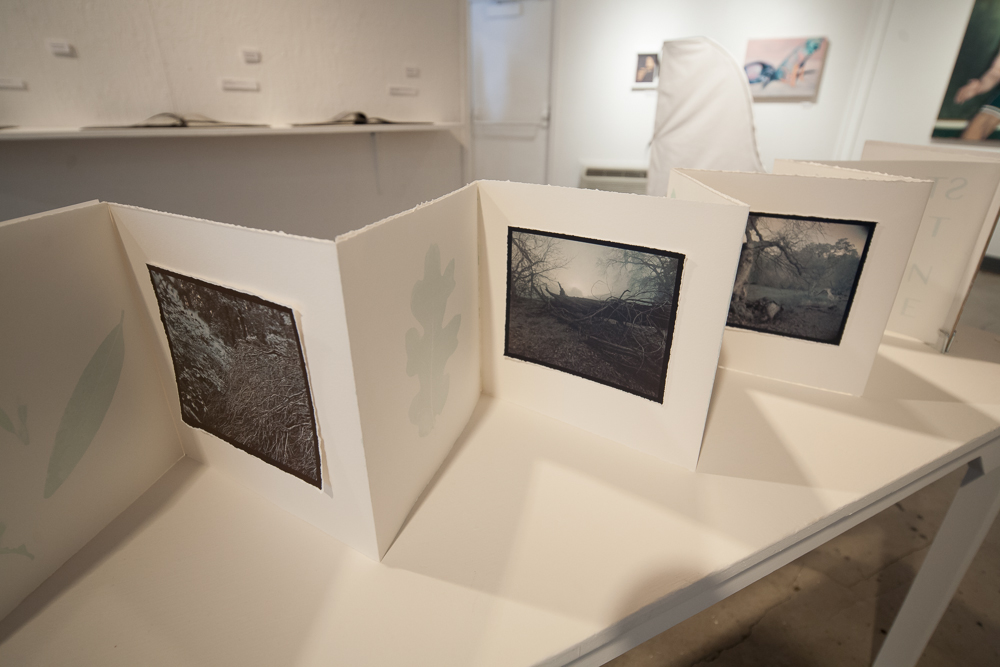
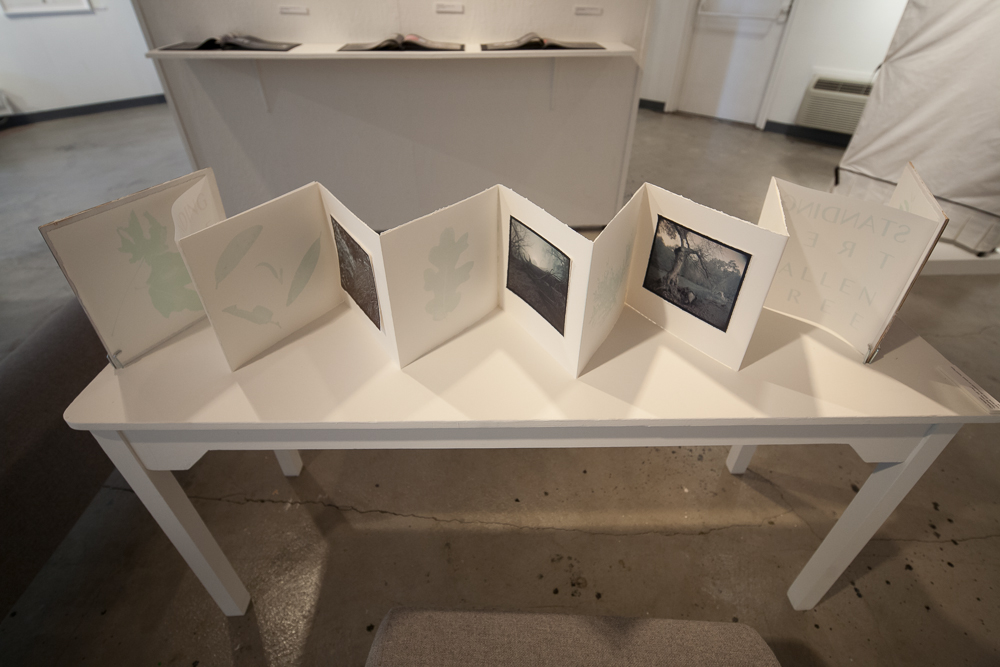
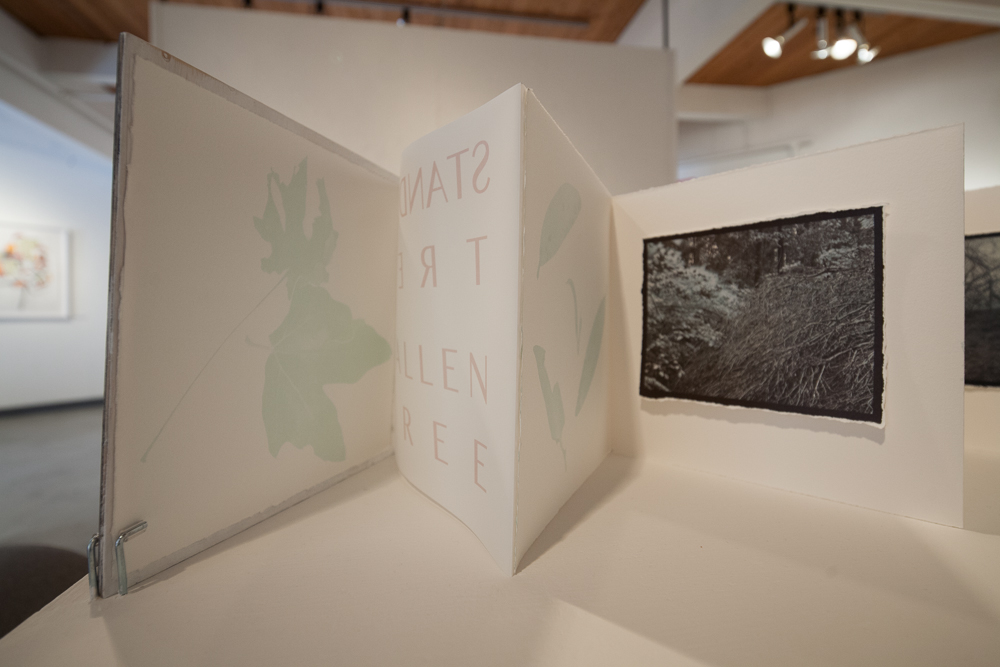


Cyano-Gum Procedure
I maintain a journal to record the specifics of my process; this blog post is intended as a backup copy for me and as a resource for others. I will attempt to update as changes regularly occur.
There are many different ways of doing this, here is how I am doing it these days:
I am primarily using Bergger Cot320 and shrinking it prior to coating & printing; I put fifteen, or so 16×20″ sheets in a tray with 120° distilled water for around 30 minutes (I shuffle through the sheets several times during the soak). I hang-dry the sheets on a clothes line (note: I began shrinking the paper twice after I began experiencing registration problem, but later found out [thanks, Michele Krup] that the shrinking occurred during brush sizing the paper).
In using Ware’s cyanotype formula [Cyanotype II] my current method is to dilute the stock sensitizer with equal parts distilled water (to reduce the density and intensity of prussian blue) before adding a drop of 40% citric acid for every 2 mil. of total sensitizer solution. I had previously been adding a drop of 40% citric acid per every 1 mil. of sensitizer (this is what the instructions from Photographer’s Formulary & Ware’s website recommended when I first ordered the kit; since that time I have been mixing from bulk chemicals). My understanding is that the addition of citric acid reduces contrast in the cyanotype print and helps the sensitizer ‘accept’ a wider range of papers; Ware’s cyanotype is more finicky regarding paper choice. I had started using Tween 20 with Bergger Cot-320 as I experienced an uneven, blotchy appearance — a result of incomplete absorption into the hard surface of the paper perhaps? I have since eliminated the surfactant because of the difficulty removing the unexposed sensitizer from the paper during the wash — if not removed pockets of residual sensitizer will ‘print out’ when exposed to UV light resulting in density spots (on the subject of spots, Ware’s cyanotype also causes a sort of graininess to the print when it becomes old or is contaminated). Now I am more thorough with brush coating and am rewarded with even coating and appearance.
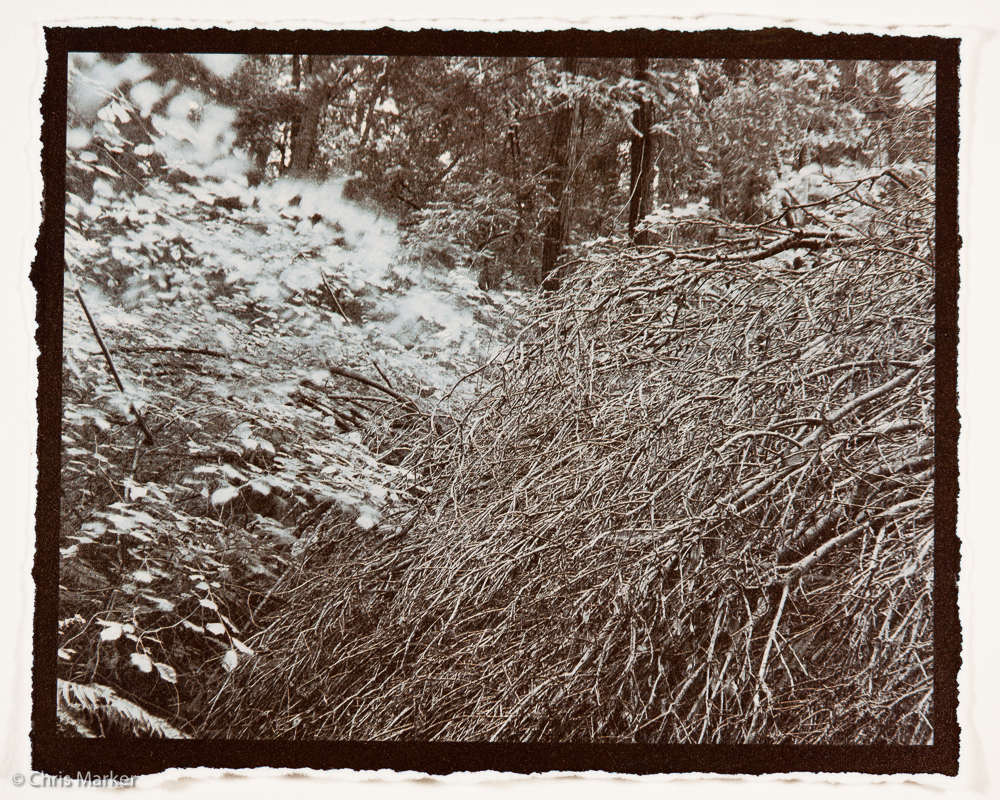
After brush coating my paper thoroughly horizontally, vertically, and then horizontally again (being patient and slow — there are no awards for fast, sloppy coating), I allow it to air-dry for around an hour, or so with a room fan blowing gently on the coated paper. I then expose the paper using a Pictorico OHP negative and a metal halide [Nuarc] vacuum press — usually, for between 40-80 seconds (My goal in a cyanotype print is to produce a slightly underprinted, low contrast base in order to layer with subsequent gum passes to achieve an aggregate print that exhibits a full tonal range with adequate contrast — I consider the color provided by the gum process to be essential to my goals).
I then develop the print immediately in 70° [+/- 2°] water. After a minute, I change the water and rinse for another minute. If the yellow-green sensitizer is no longer visible I then remove the print from the water and, after changing the water again, I add a splash of hydrogen peroxide and swish it around well before adding the print back to the water for 30 seconds. I change the water again after this and continue washing for around 20 minutes (Ware writes, “20 minute wash” on his website).
After the print is completely dry — I prefer to wait at least 24 hours for the iron-based image to harden — I tape it across all edges using drafting tape on to masonite and apply Gamblin PVA size thoroughly with a stiff bristle brush. I have learned that the PVA as it dries attempts to contract [shrink] the paper which of course causes problems with registration of gum negatives; taping across all edges to rigid masonite mostly solves this problem. Do not remove tape until completely dry, an hour or so. The size prevents gum pigments from staining the naked paper surface. I sometimes end up seeing tiny paper debris, etc in the high print values, to remove these I use a small paint brush — like a 0-0000 spotting brush — that has been lightly dipped in the PVA to gently ‘pick up’ the particles. Too much PVA on the spotting brush means the gum will result in a slightly lighter value, too little PVA means that you are removing the existing size and will end up with a ‘pit’ that will stain on the first gum pass. Gum prints can, of course, simply be spotted at completion with a tiny touchup brush [000 or smaller] and watercolor paint.
Now I am ready for my first pass of gum bichromate…
I turn the humidifier on in the small room lit by incandescent lights I use for coating, allowing the paper some moisture to prevent an immediate unblendable streakiness.
I mix 1 part gum arabic — in this case we’ll say, 8cc — with 4cc of distilled water [half the amount of gum arabic] and around 2″ Raw Umber Violet [Daniel Smith] watercolor pigment from a tube. Importantly, the quantity of paint depends on how much ‘grab’ the substrate has [I would use 1.5″ of this pigment for sensitizing Yupo synthetic paper]. Also, gum arabic becomes very brittle when dry and can reticulate the printed image after 5 or 6 gum passes, this is largely prevented by adding distilled water to the sensitizer. I mix the solution in a shot glass with a small glass rod and then add potassium dichromate in equal parts to the gum arabic — again, 8cc in this case. I stir with the glass rod a bit more and then add this mixture to my coating vessel where I mix it more thoroughly with my coating brush (brushes are great as blending ‘wisks’). My cyanotypes are taped to sheets of masonite and are ready to be coated. If I have more than one piece of paper taped to the same board I will cover the ones not being coated with newsprint to prevent accidental splattering, then I quickly, but thoroughly brush horizontally, then vertically, then horizontally once more before I blend away any streaks and inconsistencies with a dry brush using the same horizontal, vertical and diagonal strokes that start firmly, but become softer and softer until I am just barely dusting the surface of the print. After all sheets are coated I move them to another room lit by safelights with a fan running to quickly dry the sensitizer on the paper. Like the PVA size, I leave the papers taped down on the masonite until entirely dry — around 20-30 minutes.
After the paper is thoroughly dry [it is not at all tacky] I dust it lightly with baby powder and remove all the powder I can with a soft brush. I have had problems with negatives sticking to the paper after being exposed; this may be the result of the gum arabic warming during exposure and becoming a bit soft and sticky, or perhaps it is because of the same problem with the PVA. The baby powder has solved this problem. I then register the Pictorico negative over the sensitized print using a light table and drafting tape [low tack, easy to remove without damaging the paper] on two corners. I sometimes print registration marks in the corners of my negatives, but in any case I register visually and have been successful with this technique (the only exception to this is when I have printed gum-only on Stonehenge black paper, in which case I use a more sophisticated registration technique). Then the print with taped negative goes into the vacuum press for around 90 seconds (for channel separations) or between 80-100 seconds (for single or composite negative).
I remove the negative and store it safely for future use (prior to using my dusting technique I would sometimes only get one use from a negative before it was too damaged; also, my print would be damaged). I set up a tray with water that is within 2 degrees of 70° after which I gently submerge the print face up in the water and agitate gently for a minute or so (this removes most of the dichromate which is highly water soluble). I carefully remove the print from the water and drain the tray into the sink after which I refill with 70° water again, but this time I carefully place the print face down in the water, lowering one edge of the paper first and then slowly and gradually ‘rolling’ the rest of the sheet into the water using a slight flex to the paper that I find avoids bubbles persisting under the surface. Care must be used because the surface is extremely delicate and even a gentle brushing or touch to the image will remove it. I leave the print undisturbed for 10-15 minutes after which time I, again, carefully remove the print and change the water (if I have two 8×10″s in the same tray I hold them with one hand back-to-back). I then repeat the immersion and give the prints another 10-15 minutes before removing them for one final rinse with gentle agitation, this time face up. I place the prints on a screen or hang them on a clothes line. When they are dry I am ready for my second gum pass (the drying process can easily be sped up with a warm blow-drier).
Again, I mix the gum arabic, distilled water and potassium dichromate and Raw Umber Violet; I do two passes of this color to build up a pleasing strength in the shadows — unless I am satisfied after the first RUV pass, in which case I would move on to the next pigment. Everything is the same as the previous step, although I may choose to reduce the exposure time slightly on this pass — say, 70-80 seconds for separate color channel negs and 70-80 seconds for a single neg.
I develop the print identically to the previous pass, as well.
When it is dry, I do the final pass adding Quinacridone Deep Gold or Burgundy Yellow Ochre [Daniel Smith] to the same sensitizing formula. The pigment used depends on how strong or weak I wish to represent a gold-yellow color. I use very little paint here, especially with QDG: a bit less than .25″. Exposure time is between 80-90″ for separate color channel negs and between 50-80″ for single neg workflow. Processing is the usual.
Upon completion of a satisfying print I generally spot any imperfections using a 000 or smaller brush and watercolor paints.
Gum Over Cyano
I used to have the incorrect idea that I could go much heavier with my paint quantity into solution when printing over cyanotypes. Probably the reason for this is that it is harder to perceive where the paint is adhering and where it is flaking off (in areas of lesser exposure) when evaluating over the stronger impression of a cyanotype. Today I started with, what is for me, a strong paint solution: 5ml gum arabic + 5ml pot. dichro + 1″ raw umber [from tube]. After exposing and developing the prints I was unsatisfied with the density of color and immediately coated another cyano with a stronger paint solution — 1.5″ of paint into the same sensitizer. After exposing for the same time and developing I was surprised to see that the cyano image was unchanged: the additional paint was too heavy and could simply not adhere at that exposure time on to the hot press surface of the paper (I have noticed that smoother surfaces are less tolerant of heavy paint quantities).
With gum, too little paint is always better than too much, although sometimes it’s hard to tell the difference.
Update:
I am trying now to refine something I started a few years ago: using opaque watercolor pigment on top of a darker surface. I began by using a black paper [Stonehenge] that was previously shrunk in hot water, sized using Gamblin PVA, registered using a set of positive separations and pins, and then printed over using the various transparent positives (C, M, Y) with Daniel Smith opaque watercolors (Titanium / Chinese White, Graphite Grey, etc).
Now I am shrinking Bergger Cot 320 paper before printing a blank traditional cyanotype formula over it to create a dark blue surface in which to size and print over using opaque watercolors with Gum Bichromate.
10/26/15:
120″ printing time. Drying and will size on 10/28. Can double-coat cyano if I don’t achieve adequate density.
Current Cyanotype Process
Prior to coating and exposing I shrink the paper in 120°+ water for 30 minutes.
In using Ware’s cyanotype formula [Cyanotype II] my current method is to dilute the stock sensitizer with equal parts distilled water (to reduce the density and intensity of prussian blue) before adding a drop of 40% citric acid for every 2 mil. of total sensitizer solution. I had previously been adding a drop of 40% citric acid per every 1 mil. of sensitizer (this is what the instructions from Photographer’s Formulary & Ware’s website recommended when I first ordered the kit; since that time I have been mixing from bulk chemicals). My understanding is that the addition of citric acid reduces contrast in the cyanotype print and helps the sensitizer ‘accept’ a wider range of papers; Ware’s cyanotype is more finicky regarding paper choice. I had started using Tween 20 with Bergger Cot-320 as I experienced an uneven, blotchy appearance — a result of incomplete absorption into the hard surface of the paper perhaps? I have since eliminated the surfactant because of the difficulty removing the unexposed sensitizer from the paper during the wash — if not removed pockets of residual sensitizer will ‘print out’ when exposed to UV light resulting in density spots (on the subject of spots, Ware’s cyanotype also causes a sort of graininess to the print when it becomes old or is contaminated). Now I am more thorough with brush coating and am rewarded with even coating and appearance.
After brush coating my paper thoroughly horizontally, vertically, and then horizontally again (being patient and slow — there are no awards for fast, sloppy coating), I allow it to air-dry for around an hour, or so with a room fan blowing gently on the coated paper. I then expose the paper using a Pictorico OHP negative and a vacuum press — usually, for around 70-80 seconds (My goal in a cyanotype print is to produce a slightly underprinted, low contrast base in order to layer with subsequent gum passes to achieve an aggregate print that exhibits a full tonal range with adequate contrast — I consider the color provided by the gum process to be essential to my goals).
I then develop the print immediately in 70° water. After a minute, I change the water and rinse for another minute. If the yellow-green sensitizer is no longer visible I then remove the print from the water and, after changing the water again, I add a splash of hydrogen peroxide and swish it around well before adding the print back to the water for 30 seconds. I change the water again after this and continue washing for around 20 minutes (Ware writes, “20 minute wash” on his website).
After the print is completely dry I tape it across all edges to masonite and apply Gamblin PVA size thoroughly with a stiff bristle brush. I have learned that the PVA as it dries attempts to contract [shrink] the paper which, of course causes problems with registration of gum negatives; taping across all edges to rigid masonite mostly solves this problem. The size prevents gum pigments from staining the naked paper surface.
Now I am ready for my first pass of gum bichromate…
